|
If you’re new to my blog, let me share my how I entered into this craft, first I watched a TON of YouTube videos. I know what you might be thinking ;) -- You Tube is AMAZING!! If you follow Kristina Werner and Jennifer McGuire, then you know how they are so encouraging at this craft that they make you feel like you can do it too! And with that self esteem boost, I was off to the craft store!
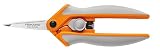
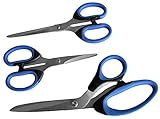
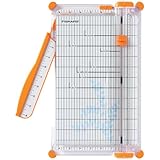
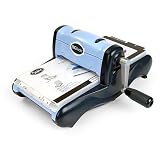
I started “small”. My first try at card making was Christmas cards*. I found a Christmas theme red-rubber wood mounted stamp at Michael’s, bought a Recollection pack of 50 card bases with envelopes as well as red and green ink pads. After that, I was hooked, and for Christmas I received a paper trimmer, 12x12 paper pads and gift cards to Michael’s to get me stocked up on various supplies. *I have since learned that Christmas cards for card makers is a BIG DEAL. Let’s break down the first tip area: 1. Having the right tools can make your life easier! This is all very well and good, but if you go out and buy the most expensive products, and NEVER use them, then you will have wasted your money. To paraphrase the Frugal Crafter, the most expensive craft tool in your supplies is the one you DON’T use. I break tools down into two categories: primary tools and secondary tools. Primary tools – things you will need to use on almost every project. This includes: - Scissors - Bone folder - Paper trimmer Scissors: I have multiple pairs of scissors. They all serve a function. When I started to build up supplies, this was one of the first things I bought. I remember purchasing a mid-priced set of 3 scissors. This set had a long, medium and small pair of scissors. The long for trimming hanging edges, medium and small to trim out images. I also bought some decorative edging scissors (not the best purchase) and later a spring handle Fiskers scissors (per Jennifer McGuire product recommendation). The spring handle scissors have really great if you have some hand issues like I do!) Bone folder: I have a basic bone folder. While I am coveting the Teflon bone folder, my current bone folder still gets the job done scoring and gives a nice crease to my card bases. Paper trimmers: There are tons out there, and as I described above I was lucky enough to have someone gift me one. Each of these trimmers will have ruler guide, using this guide you will be able to cut down pattern paper easily to mat onto your card. Some trimmers will have a score blade included (bonus!) There are two general trimmer types: (1) trimmers with cut blades and (2) guillotine style trimmers. I have also purchased a guillotine style trimmer. The trimmers with cut blades are popular, and I personally reach for this trimmer more than my guillotine. The maintenance of this item is keeping replacement cut blades handy. And if you have an older/outdated model trimmer, you might have a harder time finding the correct sized blades to use. If you want to save some future cost, a guillotine trimmer would be the best for you since it is usually self-sharpening (there is minimal maintenance to make sure the cut blades stay sharp). A few cons to having this trimmer, sometimes having too many sheets of paper will jam up cutting arm. Speaking of the cutting arms, this arm comes up when you move it around and can lead to injury if you’re not careful. Some trimmers may have a lock (mine does not – I use a rubber band). If you have little ones or animals you might want to store this in a drawer so they are not accidently injured. Secondary tools – things you want to have but may need to save a little bit before purchasing. This includes: - punches - die cut machine - heat tool Punches: Stick with basic shapes (Circle, star, heart, squares/rectangles) . Down side is that they can be bulky to store. They can also jam up with textured cardstock (ask me how I know!). This was my precursor to purchasing a die cut machine. Die cut machine: Now I know I said above that the paper trimmer ruler will assist you with cutting out paper to mat onto your card fronts, yes, that is still true. But I speak from my experience that sometimes you get tired of fussy cutting, trimming and just doing the math wrong on your measurements! A con is that die cut machine is expensive and bulky (yes, even the more compact ones)! Plus there are many secondary items for purchase and maintenance of the machine. Overall, I use my die cut machine *JUST* as much as I use my scissors. But I also ran into issues in learning how to use the machine (i.e. using the die incorrectly, or cutting paper crooked). Heat tool: This one comes in handy for embossing techniques. A down side is that you need to have an electrical source to use it and have to wait for it to cool down before storage (common sense!). You’ll need to make some free space on your craft table so that the hot air does not warp other items on your desk. I enjoy using this with embossing techniques, but I do not use it as an everyday tool (unless I am doing a set of cards with embossing). You can also use this tool to speed up drying inks and watercolors (sometimes our crafting has to be on a timer!) Do I have all these primary and secondary items, yes, I do. Have I used gift cards and coupons to purchase them, yes, I have! Find a coupon and a sale is great, but doing research on what you *really* need for your crafting experience will help eliminate buyer’s remorse (ask me how I know!) Thanks for stamping by! Earlier this month I facilitated a beginning card class at my recreation center. It was a small class and I really enjoyed it. Here are the inspirational cards that I prepared for the class. Thanks for stamping by!
|
FOLLOW ME
ABOUT ME
Pinterest pinner. Cupcake eater. Book reader. Twitter-er 
ARCHIVES
September 2017
CATEGORIES
All
|